Why the Right Golf Club Grip Matters
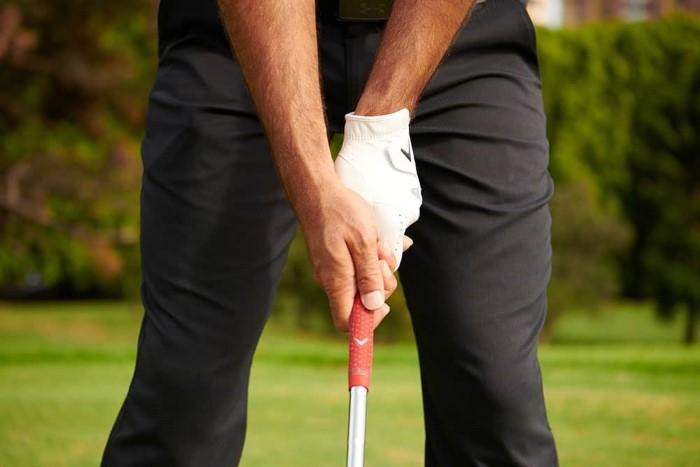
The way you hold your golf club affects several crucial aspects of your game:
- Control: A solid grip gives you better control over the direction and accuracy of your shot.
- Power: The right hand placement allows you to maximize your swing power.
- Consistency: A proper grip helps you achieve consistent performance across your shots.
- Comfort: A good grip will also reduce the risk of injury, especially to your wrists, forearms, and shoulders.
Getting the basics right is key. So, let’s start with the fundamentals.
The Anatomy of a Golf Club Grip
Before learning how to hold a golf club, it’s helpful to familiarize yourself with the anatomy of the grip itself. Golf clubs have a handle, or shaft, which tapers toward the end. The grip is the area at the top of the club where your hands go.
Clubs typically have a rubber grip attached to this area, providing a tactile surface for your hands to hold. Modern grips often come with markings or textures to help align your hands correctly.
Parts of the Golf Club to Remember:
- Grip: The part of the shaft covered with rubber or leather where your hands rest.
- Face: The flat side of the club that makes contact with the ball.
- Shaft: The long part of the club that connects the grip to the head.
Now that you’re acquainted with the club, let’s get into the techniques.
The Basic Golf Grips
There are three primary types of grips used by golfers. Choosing the right one depends on your personal preference and hand size.
The Overlapping Grip (Vardon Grip)
The most common grip among professional golfers, this grip is often referred to as the Vardon Grip, named after the legendary golfer Harry Vardon.
How to Do It:
- Left Hand (for right-handed golfers): Place your left hand near the top of the grip, so the base of your fingers is making contact with the club. The thumb should point down the shaft, slightly to the right of center.
- Right Hand: Place your right hand just below the left, with the pinky finger of your right hand overlapping the index finger of your left hand. Both palms should face each other, and the “V” formed between your thumb and index finger should point toward your right shoulder.
The Interlocking Grip
The interlocking grip is a favorite among golfers with smaller hands or those who want more control. This grip is often used by legends like Tiger Woods and Jack Nicklaus.
- Left Hand: Similar to the overlapping grip, start with your left hand at the top of the club. Place the base of your fingers on the club and wrap your fingers around.
- Right Hand: Instead of overlapping, interlock the pinky finger of your right hand with the index finger of your left hand. This creates a more secure connection between your hands and the club.
The 10-Finger Grip (Baseball Grip)
This grip is easy to learn and is great for beginners or those with less strength in their hands.
How to Do It:
- Left Hand: Place your left hand on the club as usual, with the thumb running straight down the grip.
- Right Hand: Instead of overlapping or interlocking, place your right hand directly under the left hand, as if you’re holding a baseball bat. The two hands should connect fully without any gaps.
Hand Placement: Detailed Step-by-Step Guide
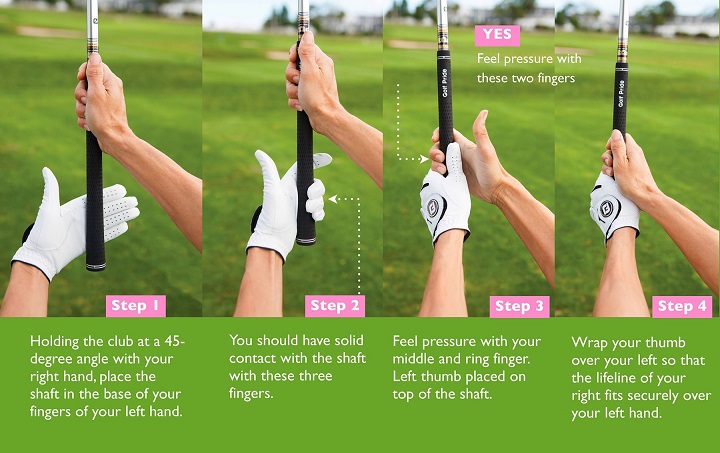
Now that you know the different types of grips, let’s break down the steps for placing your hands on the club correctly. Regardless of the grip you choose, follow these steps to ensure consistency.
Position Your Left Hand (for Right-Handed Golfers)
Start by gripping the club with your left hand. Here’s how:
- Hold the club at a 45-degree angle to the ground.
- Position the club in your fingers rather than in the palm.
- Wrap your fingers around the grip while keeping the club more in your fingers than your palm.
- Your thumb should rest just to the right of the centerline of the club’s shaft. This is known as the neutral position.
Position Your Right Hand
Once your left hand is in place, add your right hand:
- Position the club’s handle across the fingers of your right hand.
- Your right palm should cover your left thumb.
- Make sure the “V” shape created by your right thumb and index finger points towards your right shoulder.
Check Your Grip Pressure
Your grip should be firm but not tight. Imagine holding a tube of toothpaste—you want to maintain control without squeezing the paste out. Excessive grip pressure can cause tension in your arms, leading to poor swings and less flexibility.
Common Mistakes to Avoid When Gripping the Club
Even experienced golfers sometimes slip into bad habits. Here are the most common mistakes and how to avoid them:
Holding the Club Too Tightly
A tight grip can cause muscle tension and restrict the fluidity of your swing. It may also lead to fatigue, reducing your endurance on the course. Aim for a grip pressure that’s light enough to maintain fluid motion but strong enough to stay in control.
Incorrect Thumb Placement
Both thumbs should be positioned slightly off-center (right for right-handed golfers, left for left-handed golfers). If your thumbs are too central or too far off the shaft, you’ll lose control.
Uneven Hand Placement
Both hands should work as a unit. Having one hand dominating the grip can cause slices or hooks, as the clubface won’t strike the ball squarely.
Palm Dominance
One of the most common issues is gripping the club with the palms rather than the fingers. A grip that relies on the palms will reduce control and power. Remember to hold the club mostly in your fingers for better performance.
Adapting Your Grip for Different Shots
As you advance in your golfing journey, you’ll find that different shots require slight adjustments to your grip. Here’s how to adapt for various types of swings.
The Strong Grip for Draws
A strong grip involves turning both hands slightly to the right on the grip (for right-handed golfers). This grip can help create a draw, a shot that curves gently from right to left.
How to Adjust:
- Rotate both hands slightly so that more of your knuckles are visible on the left hand.
- Your “V” shapes should point more towards your right shoulder.
The Weak Grip for Fades
A weak grip involves rotating both hands slightly to the left, which can help produce a fade—a shot that curves gently from left to right.
How to Adjust:
- Rotate both hands slightly left so fewer knuckles are visible on your left hand.
- Your “V” shapes should point toward your left shoulder.
The Neutral Grip for Straight Shots
If you want a shot with minimal curvature, stick to the neutral grip where both “V” shapes point toward your right shoulder (for right-handed golfers). This is the most balanced grip for straight shots.
How to Practice and Perfect Your Grip
Like any aspect of golf, mastering your grip requires consistent practice. Here are a few ways you can work on your grip at home or on the course.
Use Alignment Tools
Many training aids are available to help golfers get their hands in the correct position. You can also use tape or markers on your club’s grip to remind you of the proper hand placement.
Do Repetitive Drills
Practicing your grip without hitting the ball can help reinforce muscle memory. Stand in front of a mirror or video yourself to ensure that your hands are positioned correctly each time.
Grip Strength Exercises
Building grip strength can help you hold the club more confidently. Exercises like squeezing a tennis ball or using a hand gripper can improve your hand strength over time.
Your Grip, Your Foundation
The way you hold your golf club is a fundamental skill that can significantly impact your overall game. Whether you’re just starting out or looking to refine your technique, focusing on your grip will improve your control, power, and consistency on the course. Take time to practice the different grip types, experiment with grip pressure, and make adjustments based on the type of shot you’re aiming for.
With the right grip, you’ll find yourself swinging with more confidence and hitting the ball more accurately. Golf is as much about precision as it is power, and the right grip is where it all starts.

